
这是一个创建于 71 天前的主题,其中的信息可能已经有所发展或是发生改变。
title: 从 0 开始做一个互联网主机秘钥 (基于 ESP32 ) description: ESP32, 秘钥, 互联网主机 slug: esp32-diy date: 2025-07-30 23:36:00+0000 image: logo.png categories:
- 人生删除指南 tags:
- 2025
- ESP32
- 秘钥
- 互联网主机
前阵子刷“什么值得买”的时候看到,
[流浪地球 2 ] 联名款互联网主机秘钥充电宝大甩卖了,
https://post.smzdm.com/p/aev3zw74/
原价两三百的玩意,有故障的大概四五十块块,能用的大概 80-90 。
200 块买个上不了飞机的充电宝是个大聪明,
90 块买个联名手办还要什么自行车啊。
于是,下单搞了一个。到手了如下:
一个数码管的显示屏,下面三个按钮可以控制显示功能。
甚至还能看到充电功率和电量~
能用,很重,不适合出门。
确实就是个手办玩具。
过了两天又想了下,要不拆了这玩意,‘
把显示屏接到自己的设备上,
在设备上写个支持 Authenticator 2FA 的程序,
让它做个真正的“互联网主机秘钥”设备?
说干就干。
首先就是选个硬件板子,需要小,同时能驱动显示屏。
看了一下,ESP32 很合适,IO 口够用,
能驱动小显示器,能连接 WIFI ,
价格也便宜~
先看下最终效果:
![]()
选个硬件板子 -> ESP32C3
上了淘宝看了一圈,最终找了一个 ESP32C3 的板子。
支持 C 口,电脑直连就完事了。
什么驱动都不需要,甚至 macOS 也是直接能用的~
开发框架 -> micropython
看了一圈开发框架之后,发现还是 micropython 比较简单。
boot.py 是框架自带的,自己的逻辑写在 main.py ,
IO 口和网络都内部自带,需要的驱动基本都能找到第三方库。
不过,需要自己刷个固件 -> 在 ESP32 上开始使用 MicroPython 。
# 安装 esptool 工具
pip install esptool

# 擦除设备

## macOS or linux
esptool.py --port /dev/ttyUSB0 erase_flash

## windows 上

python esptool --port COM6 erase_flash


# 按住 boot 键,执行刷入刷入固件
# 下载链接: https://micropython.org/download/ESP32_GENERIC_C3/
# 其他的版本自己看
esptool.py --chip esp32 --port /dev/ttyUSB0 --baud 460800 write_flash -z 0x0000 micropython.bin

## Windows 版本
python esptool --port COM6 --baud 460800 write_flash -z 0x0000 micropython.bin

## 刷入成功之后,断电重启
刷入成功之后,断电重启。
验证 micropython 环境
最简单的方案,VS Code Pymark 插件:Pymakr - Visual Studio Marketplace
装上去之后,在左侧栏目,点击一下“
”图标,选择“List Device”。
如果 ListDevice 没有出现或者报错了,
可能需要再安装一下 Nodejs 运行环境。( Windows 上碰到过:choco install nodejs 完事。)
再点击“设备 COM”,选择“连接”图标之后,在选择“终端”图标。
选择终端图标之后,能看到这个命令行界面,说明 micropython 环境好了。
如果看到的是报错,估计是上面的固件没有刷好。
重新尝试输入固件即可。
PS:可能需要切换--baud 460800 输入,具体的看 micropython 文档或者问下 AI
esptool.py --chip esp32 --port /dev/ttyUSB0 --baud 460800 write_flash -z 0x0000 micropython.bin
选个屏幕 -> 2.25 寸长条屏
选屏幕是个大难题了。找了一圈很难找到这个规格的屏幕。
这玩意显示区域:1.8CM 高,15CM 宽,长条形。
在淘宝翻了一圈都没找到类似的规格。
最后退而求次:2.25 寸 TFT 液晶屏幕。
支持了 ST7789 ( micropython 有 st7789.py 驱动)。
显示屏的 8P 接口分表是:GND 、VCC 、SCL 、SDA 、RST 、DC 、CS 、BL 。
对着 ESP32 的引脚,就是在右侧一个个接进去。
ESP32 的引脚分别是:GND 、3.3V 、GPIO02 、GPIO03 、GPIO02 、GPIO10 、GPIO06 、GPIO07
对应代码:
你的接线: SCL 、SDA 、RST 、DC 、CS -> GPI002 、GPI003 、GPI010 、GPI006 、GPI007
SCK_PIN = 2 # SCL 引脚 (时钟) -> GPI002
MOSI_PIN = 3 # SDA 引脚 (数据) -> GPI003
RST_PIN = 10 # RST 引脚 (复位) -> GPI010
DC_PIN = 6 # DC 引脚 (数据/命令) -> GPI006
CS_PIN = 7 # CS 引脚 (片选) -> GPI007
-------------`--------------
最后屏幕的 BE 口接到另一个 GND 。(这里我也没弄懂,测试出来的
然后屏幕就点亮了。
"开始表演" :项目代码 -rw-r--r-- 1 liguobao staff 6.3K 7 30 11:05 http_server.py -rw-r--r-- 1 liguobao staff 4.3K 7 30 11:05 main.py -rw-r--r-- 1 liguobao staff 265B 7 20 13:53 pymakr.conf -rw-r--r-- 1 liguobao staff 1.6K 7 30 11:05 show_text.py -rw-r--r--@ 1 liguobao staff 30K 7 22 15:19 st7789.py -rw-r--r--@ 1 liguobao staff 3.6K 7 22 15:19 vga1_8x8.py
st7789 和 vga1 都来源于: https://github.com/russhughes/st7789py_mpy/
连接 WIFI + 实现 HTTP 服务 http_server.py
import network
import time
import socket
#from show_text import display_text_on_tft

# --- WiFi 网络配置列表 ---
WIFI_NETWORKS = [
    {"ssid": "xiaomi_505", "password": "密码"},
    {"ssid": "miaowuwu_505", "password": "密码"}
]

def connect_wifi(ssid, password):
    """连接到指定的 WiFi 网络"""
    wlan = network.WLAN(network.STA_IF)
    wlan.active(True)

    if not wlan.isconnected():
        print(f"正在连接 WiFi: {ssid}")
        wlan.connect(ssid, password)
        for _ in range(15): # 最多等待 15 秒
            if wlan.isconnected():
                ip_address = wlan.ifconfig()[0]
                print(f"连接成功,IP 地址: {ip_address}")
                return ip_address
            time.sleep(1)
        print(f"WiFi 连接失败: {ssid}")
        return None
    else:
        ip_address = wlan.ifconfig()[0]
        print(f"WiFi 已连接,IP 地址: {ip_address}")
        return ip_address

def connect_to_available_wifi():
    """尝试连接到可用的 WiFi 网络"""
    print("开始扫描并连接可用的 WiFi 网络...")

    wlan = network.WLAN(network.STA_IF)
    wlan.active(True)

    # 如果已经连接,直接返回 IP 地址
    if wlan.isconnected():
        ip_address = wlan.ifconfig()[0]
        print(f"WiFi 已连接,IP 地址: {ip_address}")
        return ip_address

    # 扫描可用的 WiFi 网络
    print("正在扫描 WiFi 网络...")
    networks = wlan.scan()
    available_ssids = [net[0].decode('utf-8') for net in networks]
    print(f"扫描到的网络: {available_ssids}")

    # 尝试连接配置中的 WiFi 网络
    for wifi_config in WIFI_NETWORKS:
        ssid = wifi_config["ssid"]
        password = wifi_config["password"]

        if ssid in available_ssids:
            print(f"找到配置的网络: {ssid},尝试连接...")
            ip_address = connect_wifi(ssid, password)
            if ip_address:
                return ip_address
        else:
            print(f"未找到网络: {ssid}")

    print("无法连接到任何配置的 WiFi 网络")
    return None


def url_decode(text):
    """简单的 URL 解码"""
    text = text.replace('+', ' ')
    text = text.replace('%20', ' ')
    text = text.replace('%21', '!')
    text = text.replace('%22', '"')
    text = text.replace('%23', '#')
    text = text.replace('%24', '$')
    text = text.replace('%25', '%')
    text = text.replace('%26', '&')
    text = text.replace('%27', "'")
    text = text.replace('%28', '(')
    text = text.replace('%29', ')')
    text = text.replace('%2A', '*')
    text = text.replace('%2B', '+')
    text = text.replace('%2C', ',')
    text = text.replace('%2D', '-')
    text = text.replace('%2E', '.')
    text = text.replace('%2F', '/')
    return text

def handle_request(tft, conn):
    """处理 HTTP 请求"""
    try:
        request = conn.recv(1024).decode('utf-8')
        print(f"收到请求:\n{request}")

        # 解析请求行
        lines = request.split('\n')
        if lines:
            request_line = lines[0]
            parts = request_line.split(' ')
            if len(parts) >= 2:
                method = parts[0]
                path = parts[1]

                print(f"方法: {method}, 路径: {path}")

                if method == 'GET':
                    # 解析查询参数
                    if '?' in path:
                        path_part, query_part = path.split('?', 1)
                        params = {}
                        for param in query_part.split('&'):
                            if '=' in param:
                                key, value = param.split('=', 1)
                                params[key] = url_decode(value)

                        # 获取 text 参数
                        received_text = params.get('text', None)
                    else:
                        received_text = None
                    if not received_text:
                        response = """HTTP/1.1 400 Bad Request\r
Content-Type: text/plain\r
Connection: close\r
\r
Bad Request: 'text' parameter is required"""
                        print("请求中缺少'text'参数")
                        conn.send(response.encode('utf-8'))
                        conn.close()
                        return

                    print(f"从 GET 请求中提取的文本: '{received_text}'")
                    show_text = f"Received Text:\n{received_text}"
                    # 显示器代码
                    # display_text_on_tft(tft, show_text)

                    # 发送成功响应
                    response = """HTTP/1.1 200 OK\r
Content-Type: text/plain\r
Connection: close\r
\r
Text received and displayed!"""
                else:
                    # 方法不允许
                    response = """HTTP/1.1 405 Method Not Allowed\r
Content-Type: text/plain\r
Connection: close\r
\r
Method Not Allowed. Only GET is supported."""
            else:
                response = """HTTP/1.1 400 Bad Request\r
Content-Type: text/plain\r
Connection: close\r
\r
Bad Request"""
        else:
            response = """HTTP/1.1 400 Bad Request\r
Content-Type: text/plain\r
Connection: close\r
\r
Bad Request"""

        conn.send(response.encode('utf-8'))
    except Exception as e:
        print(f"处理请求时出错: {e}")
        try:
            error_response = """HTTP/1.1 500 Internal Server Error\r
Content-Type: text/plain\r
Connection: close\r
\r
Internal Server Error"""
            conn.send(error_response.encode('utf-8'))
        except:
            pass
    finally:
        conn.close()

def start_http_server(tft, ip_address, port=80):
    """启动 HTTP 服务器"""
    addr = socket.getaddrinfo(ip_address, port)[0][-1]
    s = socket.socket()
    s.setsockopt(socket.SOL_SOCKET, socket.SO_REUSEADDR, 1)
    s.bind(addr)
    s.listen(1)

    print(f'HTTP 服务器已启动,监听地址: http://{ip_address}:{port}')
    display_text_on_tft(tft, f"HTTP Server\nListening on {ip_address}:{port}")

    while True:
        try:
            conn, addr = s.accept()
            print(f'客户端连接来自: {addr}')
            handle_request(tft, conn)
        except KeyboardInterrupt:
            print("服务器停止")
            break
        except Exception as e:
            print(f"服务器错误: {e}")

    s.close()
主函数 -> 屏幕初始化 + 适配高度、宽度
import network
import time
import socket
from machine import Pin, SPI
import vga1_8x8 as font
import st7789
from show_text import display_text_on_tft
from http_server import connect_to_available_wifi, handle_request, start_http_server


# --------------------------

# --- ST7789 显示屏引脚定义 ---
# 你的接线: SCL 、SDA 、RST 、DC 、CS -> GPI002 、GPI003 、GPI010 、GPI006 、GPI007
SCK_PIN  = 2   # SCL 引脚 (时钟) -> GPI002
MOSI_PIN = 3   # SDA 引脚 (数据) -> GPI003
RST_PIN  = 10  # RST 引脚 (复位) -> GPI010
DC_PIN   = 6   # DC 引脚 (数据/命令) -> GPI006
CS_PIN   = 7   # CS 引脚 (片选) -> GPI007
# -------------`--------------


# 初始化 TFT 对象
spi = SPI(1, baudrate=10000000, polarity=0, phase=0, sck=Pin(SCK_PIN), mosi=Pin(MOSI_PIN))
dc = Pin(DC_PIN, Pin.OUT)
rst = Pin(RST_PIN, Pin.OUT)
cs = Pin(CS_PIN, Pin.OUT)

# 确保 CS 引脚初始状态
cs.value(1)
time.sleep(0.01)

# 硬件复位序列
rst.value(1)
time.sleep(0.01)
rst.value(0)
time.sleep(0.01)
rst.value(1)
time.sleep(0.12)  # 等待复位完成


def test_display_basic():
    """基础显示测试函数"""
    print("开始基础显示测试...")

    # 手动发送基础命令测试
    def send_command(cmd, data=None):
        cs.value(0)
        dc.value(0)  # 命令模式
        spi.write(cmd)
        if data:
            dc.value(1)  # 数据模式
            spi.write(data)
        cs.value(1)
        time.sleep(0.01)

    print("发送基础初始化命令...")
    send_command(b'\x01')  # 软件复位
    time.sleep(0.15)
    send_command(b'\x11')  # 退出睡眠
    time.sleep(0.12)
    send_command(b'\x29')  # 显示开启
    time.sleep(0.1)

    print("基础测试完成")


def init_st7789_display(st_width, st_height, rotation=1):
    """初始化 ST7789 显示屏"""
    print(f"初始化 ST7789 显示屏: {st_width}x{st_height}, 旋转: {rotation}")
    tft = st7789.ST7789(spi, st_width, st_height, reset=rst, cs=cs, dc=dc, rotation=rotation)

    # rotation 对应 MADCTL 的 x36 寄存器值
    rotation_to_x36 = {
        0: 0x00,  # 默认竖屏
        1: 0x60,  # 顺时针 90 度,横屏
        2: 0xC0,  # 180 度旋转
        3: 0xA0,  # 顺时针 270 度
    }
    x36_value = rotation_to_x36.get(rotation, 0x00)
    print(f"内存访问控制值: {x36_value:#04x}")

    # 根据 rotation 选择列地址和行地址范围
    if rotation % 2 == 0:
        col_start, col_end = 0, 75    # width - 1
        row_start, row_end = 0, 283   # height - 1
    else:
        col_start, col_end = 0, 283
        row_start, row_end = 0, 75

    init_commands = [
        (b'\x01', None, 150),  # 软件复位
        (b'\x11', None, 120),  # 退出睡眠模式
        (b'\x3A', b'\x05', 10),  # 设置像素格式 RGB565
        (b'\x36', bytes([x36_value]), 10),  # 内存访问控制
        (b'\x2A', col_start.to_bytes(2, 'big') + col_end.to_bytes(2, 'big'), 10),  # 列地址设置
        (b'\x2B', row_start.to_bytes(2, 'big') + row_end.to_bytes(2, 'big'), 10),  # 行地址设置
        (b'\x21', None, 10),  # 显示反转
        (b'\x13', None, 10),  # 正常显示
        (b'\x29', None, 100),  # 显示开启
    ]

    tft.init(init_commands)
    print("init_commands finished")
    test_display_basic()

    # 测试像素显示
    try:
        tft.pixel(0, 0, 0xFFFF)  # 左上角
        tft.pixel(st_width // 2, st_height // 2, 0xF800)  # 中心点红色
        tft.pixel(st_width - 1, st_height - 1, 0xFFFF)  # 右下角
        print(f"{st_width}x{st_height} 显示区域设置成功")
        return tft
    except Exception as e:
        print(f"显示测试失败: {e}")
        return None


# 135 x 240 显示屏的初始化
# 这里假设你使用的是 ST7789 显示屏,分辨率为 135x240
# 如果你使用的是其他型号,请根据实际情况调整参数
ST_WIDTH = 240  # 驱动内部理解为 width ,但实际在横屏时变成了 height
ST_HEIGHT = 320

# 初始化 TFT 对象
tft = init_st7789_display(ST_WIDTH, ST_HEIGHT, 3)  # 旋转 3 表示顺时针 270 度


def main():
    """主程序入口"""
    print("--- ESP32-C3 ---")
    tft.fill(st7789.BLACK)  # 黑色背景
    display_text_on_tft(tft, "ESP32-C3 TFT Display\nReady to receive text...")
    ip_address = connect_to_available_wifi()
    start_http_server(tft, ip_address)

if __name__ == "__main__":
    main()
多行文本显示
from machine import Pin, SPI
import vga1_8x8 as font
import st7789

def display_text_on_tft(tft, text_content):
    """在 TFT 显示屏上显示文本内容( 5 行,35 字符限制,行起点 x=20 )"""
    if not tft:
        print("错误: TFT 显示屏未初始化。")
        return

    tft.fill(st7789.BLACK)  # 黑底

    # 标题栏
    tft.text(font, "Received Text:", 20, 2, 0x07FF)
    tft.text(font, "-" * 35, 20, 12, 0x07FF)

    x_offset = 20  # 每行起点 x 坐标修改为 20
    max_chars_per_line = 35
    y_start = 85  # 每行起点 y 坐标修改为 85
    line_height = font.HEIGHT + 1
    max_lines = 5  # 只显示 5 行

    lines = text_content.split('\n')
    line_count = 0

    for line in lines:
        while len(line) > max_chars_per_line:
            if line_count < max_lines:
                y_offset = y_start + line_count * line_height
                line_text = line[:max_chars_per_line]
                print(f"显示行: {line_text} at y={y_offset}")
                tft.text(font, line_text, x_offset, y_offset, st7789.WHITE)
                line = line[max_chars_per_line:]
                line_count += 1
            else:
                # 行数用完,显示提示
                tft.text(font, "... (more)", x_offset, y_start + (max_lines - 1) * line_height, 0xF800)
                return

        if line_count < max_lines:
            tft.text(font, line, x_offset, y_start + line_count * line_height, st7789.WHITE)
            line_count += 1
        else:
            tft.text(font, "... (more)", x_offset, y_start + (max_lines - 1) * line_height, 0xF800)
            return
最终效果
装回去之后发现显示反了,安装位置没法改了,直接改下代码算了。
内部走线
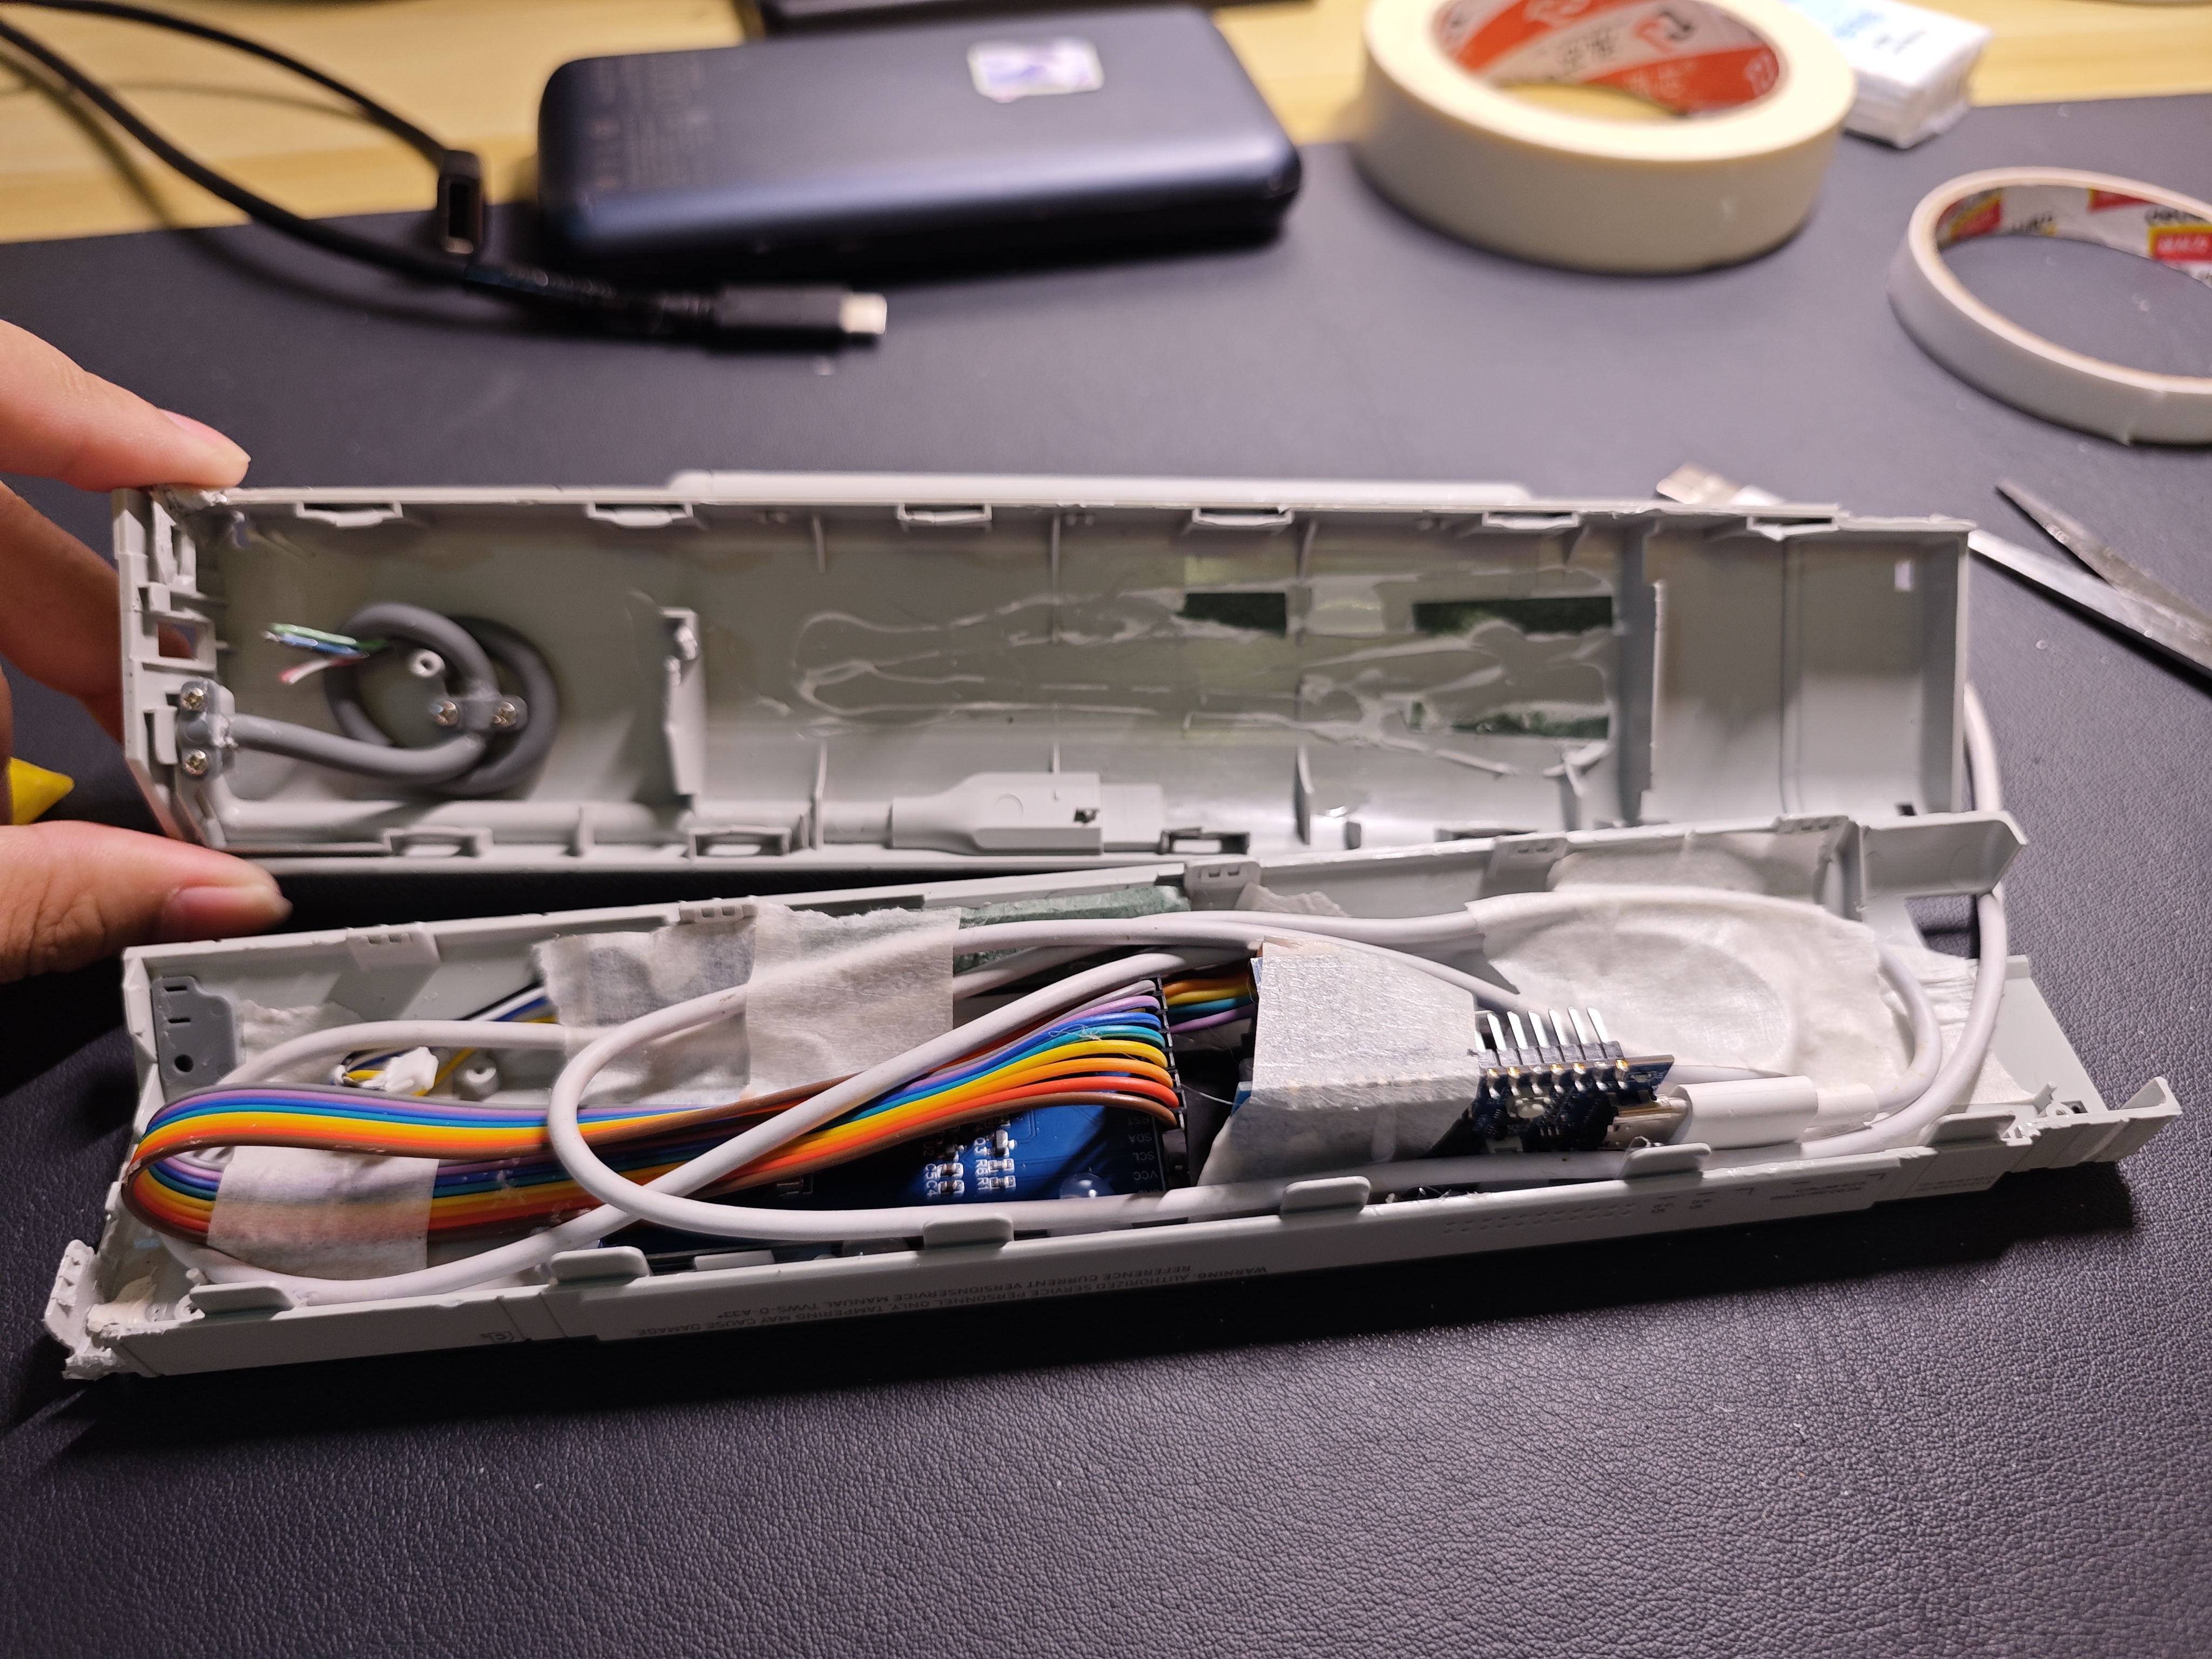
塞了个 USB 线进去,供电+数据传输
总结
因为屏幕尺寸和驱动支持的尺寸不那么匹配,最后采用的方案是代码逻辑上实现裁剪。
又因为屏幕尺寸翻转的时候需要更改内存地址,折腾这个搞了很久。
其他的代码倒都是不断试错验证,没太大的问题。
后记 -> “友情忠告”
该设备组装是靠着固体胶水和卡扣,
不存在后期拆装的可能。
一切的拆装都基于暴力和破坏。
所以:
这玩意的拆卸是“有损方案”,不存在无损拆装改造。
这玩意的拆卸是“有损方案”,不存在无损拆装改造。
这玩意的拆卸是“有损方案”,不存在无损拆装改造。
内部屏幕没找到适配的 IC 驱动板,
左右两侧一共四个电源线焊接不那么牢固,
拆装过程很容易断开,
正常情况下很难复用这玩意
(有朋友有方案可以滴滴我。
电池拆装有起火风险,请谨慎操作。
电池拆装有起火风险,请谨慎操作。
电池拆装有起火风险,请谨慎操作。
最后。
祝玩得开心~
资料连接:
5 条回复 • 2025-08-06 14:31:19 +08:00
 |
1
lairdnote 71 天前
哈哈 牛 学习了
|
 |
2
codelover2016 OP @lairdnote 折腾不止。
|
|
3
lairdnote 70 天前
@codelover2016 当年的 stm32f103 翻出来玩点东西 技术就是折腾
|
 |
4
TrackBack 69 天前
怎么买到 90 块的?链接进去没翻到
|
|
5
codelover2016 OP @TrackBack 咸鱼找就可以,坏的估计不到 50 ,好的就是 90 左右(当然那群人可能涨价了。
|